篇首语:本文由编程笔记#小编为大家整理,主要介绍了PV-RCNN论文和逐代码解析相关的知识,希望对你有一定的参考价值。
第一阶段:
1、MeanVFE (voxel特征编码)
2、VoxelBackBone8x(3D CNN 提取voxel特征)
3、HeightCompression(高度方向Z轴堆叠)
5、BaseBEVBackbone(SECOND中的RPN层)
6、AnchorHeadSingle(anchor分类和回归头)
4、VoxelSetAbstraction(VSA模块,对不同voxel特征层完成SA)
第二阶段:
7、PointHeadSimple Predicted Keypoint Weighting (PKW前背景权重加权)
8、PVRCNNHead(二阶proposal精调)
在PV-RCNN论文和逐代码解析(一)中,已经实现了上述模块的黑色部分,其与SECOND网络的实现大致相同,可以看我上篇文章:
PV-RCNN论文和逐代码解析(一)_NNNNNathan的博客-CSDN博客1、前言当前的点云3D检测主要分为两大类,第一类为grid-based的方法,第二类为point-based的方法。grid-based的方法将不规则的点云数据转换成规则的3D voxels (VoxelNet, SECOND , Fast PointRCNN, Part A^2 Net)或者转化成 2D的BEV特征图(PIXOR, HDNet,PointPillars),这种方法可以将不规则的数据转换后使用3D或者2D的CNN来高效的进行特征提取。... https://blog.csdn.net/qq_41366026/article/details/123349889?spm=1001.2014.3001.5502
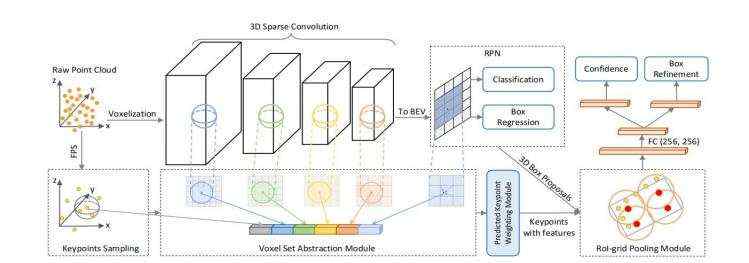
其中第四点(VSA模块)与第一阶段的区域提议是分开的两条计算线;先完成对voxel的Set Abstraction操作后,再在第二阶段的box refinement中融合不同的特征来更好的定位bbox。
PV-RCNN在3D卷积的多层的voxel特整层上对voxel进行set abstraction操作,用一小部分关键点来编码整个场景,用于后续的proposal refinement network。
代码都在:pcdet/models/backbones_3d/pfe/voxel_set_abstraction.py
为了让采样的一小部分关键点均匀分布在稀疏的点云中,首先对原始的点云数据进行了最远点采样(Furthest Point Sampling),其中KITTI数据集采样2048个关键点,Waymo数据集采样4096个关键点。
def get_sampled_points(self, batch_dict):
"""
Args:
batch_dict:
Returns:
keypoints: (N1 + N2 + ..., 4), where 4 indicates [bs_idx, x, y, z]
"""
batch_size = batch_dict['batch_size']
if self.model_cfg.POINT_SOURCE == 'raw_points':
# 取出所有原始点的xyz数据, shape (N_raw_point, 3) batch_id, x, y, z, r
src_points = batch_dict['points'][:, 1:4]
# 取出所有点对应的batch_id, shape (N_raw_point,)
batch_indices = batch_dict['points'][:, 0].long()
elif self.model_cfg.POINT_SOURCE == 'voxel_centers':
src_points = common_utils.get_voxel_centers(
batch_dict['voxel_coords'][:, 1:4],
downsample_times=1,
voxel_size=self.voxel_size,
point_cloud_range=self.point_cloud_range
)
batch_indices = batch_dict['voxel_coords'][:, 0].long()
else:
raise NotImplementedError
# 创建用于存储关键点的列表
keypoints_list = []
# 逐帧点云获取关键点
for bs_idx in range(batch_size):
# 得到属于当前帧的mask
bs_mask = (batch_indices == bs_idx)
# 索引出所有属于当前帧的点 shape (1, num_of_point, 3)
sampled_points = src_points[bs_mask].unsqueeze(dim=0) # (1, N, 3)
# 根据采样的模式,此处是最远点采样,
# 在KITTI中关键点个数为2048,在Waymo中关键点个数为4096
# cur_pt_idxs shape (1, 2048) 为关键点在原始点云中的索引
if self.model_cfg.SAMPLE_METHOD == 'FPS':
cur_pt_idxs = pointnet2_stack_utils.farthest_point_sample(
sampled_points[:, :, 0:3].contiguous(), self.model_cfg.NUM_KEYPOINTS
).long()
# 如果采样点数小于设置的采样点数,则重复采样至设置采样点数
if sampled_points.shape[1]
non_empty = cur_pt_idxs[0, :sampled_points.shape[1]]
cur_pt_idxs[0] = non_empty.repeat(times)[:self.model_cfg.NUM_KEYPOINTS]
# 根据cur_pt_idxs取出当前帧的所有关键点 shape (1, 2048, 3)
keypoints = sampled_points[0][cur_pt_idxs[0]].unsqueeze(dim=0)
elif self.model_cfg.SAMPLE_METHOD == 'SPC':
cur_keypoints = self.sectorized_proposal_centric_sampling(
roi_boxes=batch_dict['rois'][bs_idx], points=sampled_points[0]
)
bs_idxs = cur_keypoints.new_ones(cur_keypoints.shape[0]) * bs_idx
keypoints = torch.cat((bs_idxs[:, None], cur_keypoints), dim=1)
else:
raise NotImplementedError
# 将当前帧中选取的关键点加入keypoints_list列表
keypoints_list.append(keypoints)
# 在第0维度将所有关键点进行拼接 (2048*batch_size, 3)
keypoints = torch.cat(keypoints_list, dim=0) # (B, M, 3) or (N1 + N2 + ..., 4)
# 将keypoints数据中该点所属帧 (batch_idx, x, y, z)
if len(keypoints.shape) == 3:
batch_idx = torch.arange(batch_size,
device=keypoints.device).view(-1, 1).repeat(1, keypoints.shape[1]).view(-1, 1)
keypoints = torch.cat((batch_idx.float(), keypoints.view(-1, 3)), dim=1)
return keypoints
得到选取的关键点 shape : (batch*2048, 4) , 4-->batch_idx, x, y, z
PV-RCNN中使用了PointNet++中提出的SA操作来对不同尺度上的voxel特征进行聚合。
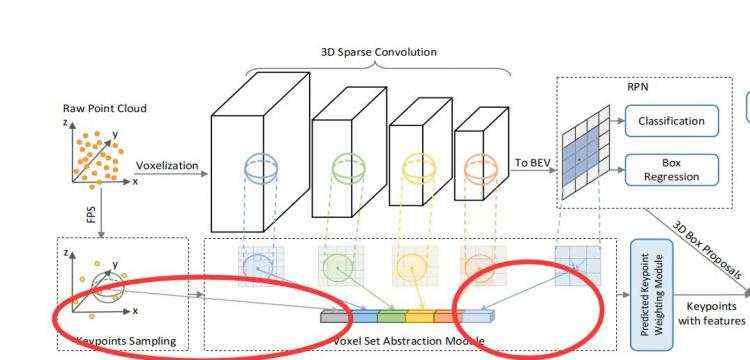
在VoxelBackBone8x中,分别得到了1x,2x, 4x, 8x的voxel-wise feature volumes,VSA操作会分别在这些尺度的voxel-wise feature volumes上进行,得到4个尺度的voxel编码特征。如下图所示

VSA的实现与PointNet++的SA操作相同,只不过将操作对象从原始点云中的点换成了voxel-wise feature。
公式表述如下:

 为经过3D CNN的第K层的voxel特征的集合
 为voxel在第K层中的3D坐标,Nk是第K层中非空的voxel
 为 每个voxel 特征在对应半径内关键点的相对位置信息
对每一个关键点,首先确定他在第K层上,半径为R_k邻域内的非空voxel,将这些非空voxel组成voxel-wsie的特征向量集合;然后将不同尺度上相同关键点获取的voxel-wsie的特征向量拼接在一起,并使用一个简单的PointNet网络来融合该关键点不同尺度的特征,公式如下:

其中M(·)代表在k层中固定半径内voxel 特征集合中的随机采样操作,在实现中,每个集合中最大采样16或32个voxel-wise feature,节省计算资源;G(·)代表多层感知网络(MLP),来编码voxel-wise的特征和相对位置。max(·)操作取每个voxel set中特征最大的voxel-wise feature。
同时,每一层的R_k设置如下(单位:米),用于聚合不同的感受野信息:
1x : [0.4, 0.8] ,采样数[16, 16],MLP维度[[16, 16], [16, 16]]
2x : [0.8, 1.2],采样数[16, 32],MLP维度[[32, 32], [32, 32]]
3x : [1.2, 2.4],采样数[16, 32],MLP维度[[64, 64]], [64, 64]]
4x : [2.4, 4.8],采样数[16, 32],MLP维度[[64, 64], [64, 64]]
得到的特征为:

最终学习到的特征 结合了基于3DCNN学习到的特征
 和基于PointNet从voxel-wise SA中学习到的特征。
在对每层3D卷积的输出进行VSA操作后,为了能够是学习到的特征更加丰富,作者扩展了VSA模块;在原来VSA模块的特征上加上了来自原点的SA特征和来自堆叠后BEV视角的双线性插值特征,如下图所示
最终的公式如下:

加入Extended VSA的好处:
1、来自原点的SA操作可以弥补因为voxelization导致的量化损失
2、来自BEV视角的插值SA操作拥有更大的Z轴(高度)感受野
最终得到的特征 具有很强的保存3D场景结构信息的能力:
[
(2048 * batch, 256) BEV视角下点特征数据
(2048 * batch, 32) 原始点云下特征数据
(2048 * batch, 32) x_conv1 第一次稀疏卷积后特征数据
(2048 * batch, 64) x_conv2 第二次稀疏卷积后特征数据
(2048 * batch, 128) x_conv3 第三次稀疏卷积后特征数据
(2048 * batch, 128) x_conv4 第四次稀疏卷积后特征数据
]
G(·)网络结构:
Sequential(
(0): Linear(in_features=640, out_features=128, bias=False)
(1): BatchNorm1d(128, eps=1e-05, momentum=0.1, affine=True, track_running_stats=True)
(2): ReLU()
)
最终得到的关键点编码特征 维度 (batch*2048, 128)。
代码都在这个文件:pcdet/models/backbones_3d/pfe/voxel_set_abstraction.py
    def forward(self, batch_dict):
        """
        Args:
            batch_dict:
                batch_size:
                keypoints: (B, num_keypoints, 3)
                multi_scale_3d_features:
                        'x_conv4': ...
                points: optional (N, 1 + 3 + C) [bs_idx, x, y, z, ...]
                spatial_features: optional
                spatial_features_stride: optional
        Returns:
            point_features: (N, C)
            point_coords: (N, 4)
        """
        """
        ===============================
        通过最远点采样,获取每一帧点云的关键点
        ===============================
        """
        keypoints = self.get_sampled_points(batch_dict)
        """
        ============================
        Extended VSA中对BEV插值SA操作
        ============================
        """
        point_features_list = []
        if 'bev' in self.model_cfg.FEATURES_SOURCE:
            # 通过对BEV的特征进行插值获取关键点的特征数据
            point_bev_features = self.interpolate_from_bev_features(
                # 所有的关键点
                keypoints,
                # 将高度进行堆叠后的BEV特征图
                batch_dict['spatial_features'],
                # batch size
                batch_dict['batch_size'],
                # 高度堆叠后的BEV特征图的下采样倍数,默认是8倍
                bev_stride=batch_dict['spatial_features_stride']
            )
            # 将插值得到的关键点特征存入列表
            point_features_list.append(point_bev_features)
        # batch_size
        batch_size = batch_dict['batch_size']
        # 取出所有关键点的xyz坐标
        new_xyz = keypoints[:, 1:4].contiguous()
        # 存储每帧点云关键点的个数
        new_xyz_batch_cnt = new_xyz.new_zeros(batch_size).int()
        # 获取batch中每帧点云中关键点的个数
        for k in range(batch_size):
            new_xyz_batch_cnt[k] = (keypoints[:, 0] == k).sum()
        """
        所有SA层的配置中MLPS为1*1的卷积,DOWNSAMPLE_FACTOR该层对应的下采样倍数

        """
        """
        ============================
        Extended VSA中对原始点云的操作
        ============================
        POOL_RADIUS为该层对应的采样半径,
        NSAMPLE为半径内最大的采样点数
        SA_LAYER:
            raw_points:
                MLPS: [[16, 16], [16, 16]]
                POOL_RADIUS: [0.4, 0.8]
                NSAMPLE: [16, 16]
        ============================
        """
        if 'raw_points' in self.model_cfg.FEATURES_SOURCE:
            # 得到所有一批数据中所有原始点云数据 shape (N, 5) batch_id, x, y, z, r
            raw_points = batch_dict['points']
            # pooled_features: (2048 * batch, 32)
            pooled_features = self.aggregate_keypoint_features_from_one_source(
                # batch size
                batch_size=batch_size,
                # 聚合函数,这里采用PointNet++的Set Abstraction
                aggregate_func=self.SA_rawpoints,
                # 原始点的xyz数据
                xyz=raw_points[:, 1:4],
                # 每个原始点云的 reflect intensity
                xyz_features=raw_points[:, 4:].contiguous() if raw_points.shape[1] > 4 else None,
                # 每个点所在batch中的索引
                xyz_bs_idxs=raw_points[:, 0],
                # 关键点的xyz shape : (2048, 3)
                new_xyz=new_xyz,
                # 一批数据中关键点的个数
                new_xyz_batch_cnt=new_xyz_batch_cnt,
                # False
                filter_neighbors_with_roi=self.model_cfg.SA_LAYER['raw_points'].get('FILTER_NEIGHBOR_WITH_ROI', False),
                # None
                radius_of_neighbor=self.model_cfg.SA_LAYER['raw_points'].get('RADIUS_OF_NEIGHBOR_WITH_ROI', None),
                # None
                rois=batch_dict.get('rois', None)
            )
            point_features_list.append(pooled_features)
        """
        ====================================
        VSA中对不同尺度3D CNN的voxel-wise的操作
        1x, 2x, 4x, 8x
        ====================================
        POOL_RADIUS为该层对应的采样半径,
        NSAMPLE为半径内最大的采样点数
        x_conv1:
                DOWNSAMPLE_FACTOR: 1
                MLPS: [[16, 16], [16, 16]]
                POOL_RADIUS: [0.4, 0.8]
                NSAMPLE: [16, 16]
        x_conv2:
            DOWNSAMPLE_FACTOR: 2
            MLPS: [[32, 32], [32, 32]]
            POOL_RADIUS: [0.8, 1.2]
            NSAMPLE: [16, 32]
        x_conv3:
            DOWNSAMPLE_FACTOR: 4
            MLPS: [[64, 64], [64, 64]]
            POOL_RADIUS: [1.2, 2.4]
            NSAMPLE: [16, 32]
        x_conv4:
            DOWNSAMPLE_FACTOR: 8
            MLPS: [[64, 64], [64, 64]]
            POOL_RADIUS: [2.4, 4.8]
            NSAMPLE: [16, 32]
        =====================================
        """
        for k, src_name in enumerate(self.SA_layer_names):
            # 获取非空voxel的xyz的index shape : (16000*batch, 4)
            # 16000为训练中选取的最大非空voxel数
            # 4-->(batch_idx, z, y, x)
            cur_coords = batch_dict['multi_scale_3d_features'][src_name].indices
            # 获取非空voexel的特征
            cur_features = batch_dict['multi_scale_3d_features'][src_name].features.contiguous()
            # 获取每个voxel在点云坐标系中xyz的中心点坐标 (16000*batch, 3)
            xyz = common_utils.get_voxel_centers(
                cur_coords[:, 1:4], downsample_times=self.downsample_times_map[src_name],
                voxel_size=self.voxel_size, point_cloud_range=self.point_cloud_range
            )
            # VSA操作
            pooled_features = self.aggregate_keypoint_features_from_one_source(
                # batch_size
                batch_size=batch_size,
                # 第K层上的SA网络
                aggregate_func=self.SA_layers[k],
                # 所有voxel在点云坐标系下中心点的坐标
                xyz=xyz.contiguous(),
                # 所有voxel在第K层的特征
                xyz_features=cur_features,
                # 所有点在batch中的mask
                xyz_bs_idxs=cur_coords[:, 0],
                # 关键点坐标 (2048, 3)
                new_xyz=new_xyz,
                # 关键点个数
                new_xyz_batch_cnt=new_xyz_batch_cnt,
                # False
                filter_neighbors_with_roi=self.model_cfg.SA_LAYER[src_name].get('FILTER_NEIGHBOR_WITH_ROI', False),
                # None
                radius_of_neighbor=self.model_cfg.SA_LAYER[src_name].get('RADIUS_OF_NEIGHBOR_WITH_ROI', None),
                # None
                rois=batch_dict.get('rois', None)
            )
            # 得到的pooled_features 维度为 (2048 * batch, C)
            point_features_list.append(pooled_features)
        """
        [
        (2048 * batch, 256) BEV视角下点特征数据
        (2048 * batch, 32)  原始点云下特征数据
        (2048 * batch, 32)  x_conv1 第一次稀疏卷积后特征数据
        (2048 * batch, 64)  x_conv2 第二次稀疏卷积后特征数据
        (2048 * batch, 128) x_conv3 第三次稀疏卷积后特征数据
        (2048 * batch, 128) x_conv4 第四次稀疏卷积后特征数据
        ]
        """
        # point_features (2048 * batch, 640)
        point_features = torch.cat(point_features_list, dim=-1)
        batch_dict['point_features_before_fusion'] = point_features.view(-1, point_features.shape[-1])
        """
        将不同尺度拼接的特征使用一个简单的MLP网络对处在不同尺度的特征进行聚合
        vsa_point_feature_fusion
        Sequential(
          (0): Linear(in_features=640, out_features=128, bias=False)
          (1): BatchNorm1d(128, eps=1e-05, momentum=0.1, affine=True, track_running_stats=True)
          (2): ReLU()
        )
        """
        # point_features (2048 * batch, 640)-->(2048 * batch, 128)
        point_features = self.vsa_point_feature_fusion(point_features.view(-1, point_features.shape[-1]))
        # (batch*2048, C)
        batch_dict['point_features'] = point_features
        # (batch*2048, 4)    4-->(batch_id, x, y, z)
        batch_dict['point_coords'] = keypoints
        return batch_dict
BEV视角插值代码:
# 获取从BEV视角通过插值得到的关键点特征
    def interpolate_from_bev_features(self, keypoints, bev_features, batch_size, bev_stride):
        """
        Args:
            keypoints: (N1 + N2 + ..., 4)
            bev_features: (B, C, H, W)
            batch_size:
            bev_stride:
        Returns:
            point_bev_features: (N1 + N2 + ..., C)
        """
        # 得到该关键点对应的voxel的x坐标 shape : (2048*batch,)
        x_idxs = (keypoints[:, 1] - self.point_cloud_range[0]) / self.voxel_size[0]
        # 得到该关键点对应的voxel的y坐标 shape : (2048*batch,)
        y_idxs = (keypoints[:, 2] - self.point_cloud_range[1]) / self.voxel_size[1]
        # x坐标除下采样倍数 shape : (2048*batch,)
        x_idxs = x_idxs / bev_stride
        # y坐标除下采样倍数 shape : (2048*batch,)
        y_idxs = y_idxs / bev_stride
        # 结果列表
        point_bev_features_list = []
        for k in range(batch_size):  # 逐帧进行插值操作
            bs_mask = (keypoints[:, 0] == k)  # 当前帧点云的mask
            cur_x_idxs = x_idxs[bs_mask]  # 取出属于当前帧关键点的x坐标
            cur_y_idxs = y_idxs[bs_mask]  # 取出属于当前帧关键点的y坐标
            # 对当前帧的BEV特征图进行维度转换 (C, 200, 176)  --> (200, 176, C)
            cur_bev_features = bev_features[k].permute(1, 2, 0)
            # 通过双线性插值获得关键点的特征  shape (2048, C)
            point_bev_features = bilinear_interpolate_torch(cur_bev_features, cur_x_idxs, cur_y_idxs)
            # 结果放入列表中
            point_bev_features_list.append(point_bev_features)
        # 将通过插值得到的关键点特征在第0维度进行拼接 (2048*batch, C)
        point_bev_features = torch.cat(point_bev_features_list, dim=0)  # (N1 + N2 + ..., C)
        return point_bev_features
5、PointHeadSimple Predicted Keypoint Weighting
在将不同尺度的场景都编码到N个关键点后,将会在后面的精调阶段使用到这些关键点的特征,但是这些被最远点采样(FPS)算法选取出来的关键点是均匀的分布在点云中的,这就意味着有一部分的关键点并没有落在GT_box内,他们就代表了背景;作者在这里认为,属于前景的关键定应该主导box的精调,所以作者在这里加入了PKW模块用于预测改关键点属于前景点还是背景点。
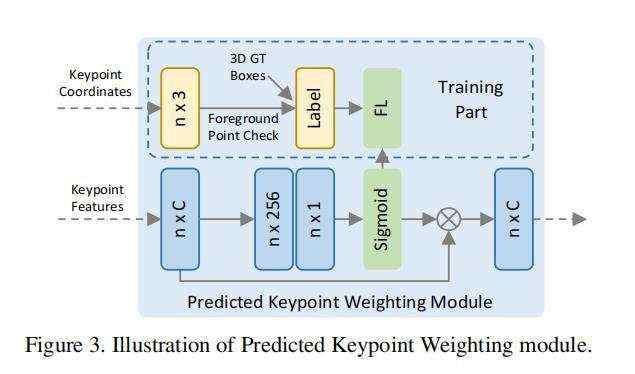
PKW模块用于调整前背景点的权重方式来实现,其中对于前背景点的分割GT值,由于在自动驾驶场景的数据集中所有的3D物体都是独立的,不会像图片中物体overlap的情况,可以直接判断一个点是否在3Dbox内即可得到前背景的类别,权重调整公式如下:

A(·)是一个三层的多层感知机,最终接上一个sigmoid函数来判断该点的属于前景的置信度。
由于3D场景中前背景点的数量过于不均衡,PKW模块使用Focal Loss进行训练,Focal Loss的alpha,gamma参数设置与RetinaNet一直,alpha为0.25,gamma为2
注:对于点前背景分割,PV-RCNN与PointRCNN中设置一直,对每个GTBox扩大0.2m,判断是否有关键点落在GTBox边沿,并将这个处于边沿的GTBox点不进行loss计算。
代码在:pcdet/models/dense_heads/point_head_simple.py
    def forward(self, batch_dict):
        """
        Args:
            batch_dict:
                batch_size:
                point_features: (N1 + N2 + N3 + ..., C) or (B, N, C)
                point_features_before_fusion: (N1 + N2 + N3 + ..., C)
                point_coords: (N1 + N2 + N3 + ..., 4) [bs_idx, x, y, z]
                point_labels (optional): (N1 + N2 + N3 + ...)
                gt_boxes (optional): (B, M, 8)
        Returns:
            batch_dict:
                point_cls_scores: (N1 + N2 + N3 + ..., 1)
                point_part_offset: (N1 + N2 + N3 + ..., 3)
        """
        # 这里取出vsa_point_feature_fusion之前的特征 shape : (batch * 2048, 640)
        if self.model_cfg.get('USE_POINT_FEATURES_BEFORE_FUSION', False):
            point_features = batch_dict['point_features_before_fusion']
        else:
            point_features = batch_dict['point_features']
        """
        前背景分类的MLP设置
            Sequential(
            (0): Linear(in_features=640, out_features=256, bias=False)
            (1): BatchNorm1d(256, eps=1e-05, momentum=0.1, affine=True, track_running_stats=True)
            (2): ReLU()
            (3): Linear(in_features=256, out_features=256, bias=False)
            (4): BatchNorm1d(256, eps=1e-05, momentum=0.1, affine=True, track_running_stats=True)
            (5): ReLU()
            (6): Linear(in_features=256, out_features=1, bias=True)
            )
        """
        # point_cls_preds  shape : (batch * 2048, 1)
        point_cls_preds = self.cls_layers(point_features)
        ret_dict =
            'point_cls_preds': point_cls_preds,

        # 将预测结果用sigmoid函数映射到0-1之间,得到前背景分类概率
        # PKW模块的权重调整会在PVRCNNHead模块中进行,将预测结果放入batch_dict
        point_cls_scores = torch.sigmoid(point_cls_preds)
        batch_dict['point_cls_scores'], _ = point_cls_scores.max(dim=-1)
        # 训练模型下,需要对关键点预测进行target assignment, 前景为1, 背景为0
        if self.training:
            targets_dict = self.assign_targets(batch_dict)
            # 存储所有关键点属于前背景的mask
            ret_dict['point_cls_labels'] = targets_dict['point_cls_labels']
        self.forward_ret_dict = ret_dict
        return batch_dict
代码在:pcdet/models/dense_heads/point_head_template.py
def assign_stack_targets(self, points, gt_boxes, extend_gt_boxes=None,
ret_box_labels=False, ret_part_labels=False,
set_ignore_flag=True, use_ball_constraint=False, central_radius=2.0):
"""
Args:
points: (N1 + N2 + N3 + ..., 4) [bs_idx, x, y, z]
gt_boxes: (B, M, 8)
extend_gt_boxes: [B, M, 8]
ret_box_labels: True
ret_part_labels: Fasle
set_ignore_flag: True
use_ball_constraint: False
central_radius:
Returns:
point_cls_labels: (N1 + N2 + N3 + ...), long type, 0:background, -1:ignored
point_box_labels: (N1 + N2 + N3 + ..., code_size)
"""
assert len(points.shape) == 2 and points.shape[1] == 4, 'points.shape=%s' % str(points.shape)
assert len(gt_boxes.shape) == 3 and gt_boxes.shape[2] == 8, 'gt_boxes.shape=%s' % str(gt_boxes.shape)
assert extend_gt_boxes is None or len(extend_gt_boxes.shape) == 3 and extend_gt_boxes.shape[2] == 8, \\
'extend_gt_boxes.shape=%s' % str(extend_gt_boxes.shape)
assert set_ignore_flag != use_ball_constraint, 'Choose one only!'
# 得到一批数据中batch_size的大小,以方便逐帧完成target assign
batch_size = gt_boxes.shape[0]
# 得到一批数据中所有点云的batch_id
bs_idx = points[:, 0]
# 初始化每个点云的类别,默认全0属于背景; shape (batch * 16384)
point_cls_labels = points.new_zeros(points.shape[0]).long()
# 初始化每个点云预测box的参数,默认全0; shape (batch * 16384, 8)
point_box_labels = gt_boxes.new_zeros((points.shape[0], 8)) if ret_box_labels else None
# None
point_part_labels = gt_boxes.new_zeros((points.shape[0], 3)) if ret_part_labels else None
# 逐帧点云数据进行处理
for k in range(batch_size):
# 得到一个mask,用于取出一批数据中属于当前帧的点
bs_mask = (bs_idx == k)
# 取出对应的点shape (16384, 3), PV-RCNN关键点(2048, 3)
points_single = points[bs_mask][:, 1:4]
# 初始化当前帧中点的类别,默认为0背景, (16384, ), PV-RCNN关键点(2048,)
point_cls_labels_single = point_cls_labels.new_zeros(bs_mask.sum())
"""PV-RCNN中点的数量是2048或者4096
points_single : (16384, 3) --> (1, 16384, 3)
gt_boxes : (batch, num_of_GTs, 8) --> (当前帧的GT, num_of_GTs, 8)
box_idxs_of_pts : (16384, ),其中点云分割中背景为-1, 前景点指向GT中的索引,
例如[-1,-1,3,20,-1,0],其中,3,20,0分别指向第3个、第20个和第0个GT
"""
# 计算哪些中点在GTbox, box_idxs_of_pts
box_idxs_of_pts = roiaware_pool3d_utils.points_in_boxes_gpu(
points_single.unsqueeze(dim=0), gt_boxes[k:k + 1, :, 0:7].contiguous()
).long().squeeze(dim=0)
# mask 表明该帧中的哪些点属于前景点,哪些点属于背景点;得到属于前景点的mask
box_fg_flag = (box_idxs_of_pts >= 0)
# 是否忽略在enlarge box中的点 True
if set_ignore_flag:
# 计算哪些点在GTbox_enlarge中
extend_box_idxs_of_pts = roiaware_pool3d_utils.points_in_boxes_gpu(
points_single.unsqueeze(dim=0), extend_gt_boxes[k:k + 1, :, 0:7].contiguous()
).long().squeeze(dim=0)
# GTBox内的点
fg_flag = box_fg_flag
# ^为异或运算符,不同为真,相同为假,这样就可以得到哪些点在GT enlarge中了
ignore_flag = fg_flag ^ (extend_box_idxs_of_pts >= 0)
# 将这些真实GT边上的点设置为-1 loss计算时,不考虑这类点
point_cls_labels_single[ignore_flag] = -1
elif use_ball_constraint:
box_centers = gt_boxes[k][box_idxs_of_pts][:, 0:3].clone()
box_centers[:, 2] += gt_boxes[k][box_idxs_of_pts][:, 5] / 2
ball_flag = ((box_centers - points_single).norm(dim=1)
else:
raise NotImplementedError
# [box_idxs_of_pts[fg_flag]]取出所有点中属于前景的点,
# 并为这些点分配对应的GT_box shape (num_of_gt_match_by_points, 8)
# 8个维度分别是x, y, z, l, w, h, heading, class_id
gt_box_of_fg_points = gt_boxes[k][box_idxs_of_pts[fg_flag]]
# 将类别信息赋值给对应的前景点 (16384, )
point_cls_labels_single[fg_flag] = 1 if self.num_class == 1 else gt_box_of_fg_points[:, -1].long()
# 赋值点的类别GT结果到的batch中对应的帧位置
point_cls_labels[bs_mask] = point_cls_labels_single
# 如果该帧中GT的前景点的数量大于0且需要预测每个点的box PV-RCNN中不需要,PointRCNN中需要
if ret_box_labels and gt_box_of_fg_points.shape[0] > 0:
# 初始化该帧中box的8个回归参数,并置0
# 此处编码为(Δx, Δy, Δz, dx, dy, dz, cos(heading), sin(heading)) 8个
point_box_labels_single = point_box_labels.new_zeros((bs_mask.sum(), 8))
# 对属于前景点的box进行编码 得到的是 (num_of_fg_points, 8)
# 其中8是(Δx, Δy, Δz, dx, dy, dz, cos(heading), sin(heading))
fg_point_box_labels = self.box_coder.encode_torch(
gt_boxes=gt_box_of_fg_points[:, :-1], points=points_single[fg_flag],
gt_classes=gt_box_of_fg_points[:, -1].long()
)
# 将每个前景点的box信息赋值到该帧中box参数预测中
# fg_point_box_labels: (num_of_GT_matched_by_point,8)
# point_box_labels_single: (16384, 8)
point_box_labels_single[fg_flag] = fg_point_box_labels
# 赋值点的回归编码结果到的batch中对应的帧位置
point_box_labels[bs_mask] = point_box_labels_single
# False
if ret_part_labels:
point_part_labels_single = point_part_labels.new_zeros((bs_mask.sum(), 3))
transformed_points = points_single[fg_flag] - gt_box_of_fg_points[:, 0:3]
transformed_points = common_utils.rotate_points_along_z(
transformed_points.view(-1, 1, 3), -gt_box_of_fg_points[:, 6]
).view(-1, 3)
offset = torch.tensor([0.5, 0.5, 0.5]).view(1, 3).type_as(transformed_points)
point_part_labels_single[fg_flag] = (transformed_points / gt_box_of_fg_points[:, 3:6]) + offset
point_part_labels[bs_mask] = point_part_labels_single
# 将每个点的类别、每个点对应box的7个回归参数放入字典中
targets_dict =
# 将一个batch中所有点的GT类别结果放入字典中 shape (batch * 16384)
'point_cls_labels': point_cls_labels,
# 将一个batch中所有点的GT_box编码结果放入字典中 shape (batch * 16384) shape (batch * 16384, 8)
'point_box_labels': point_box_labels,
# None
'point_part_labels': point_part_labels
return targets_dict
6、PVRCNNHead(二阶proposal精调)
在第VSA模块中,已经一帧点云场景编码到一小部分拥有多尺度语义信息的关键点特征中,同时,也由BEV视角下生成了很多3D的proposal(ROI);在第二阶段的refinement过程中,需要将来自ROI的特征融合关键点的特征,提升最终box预测的准确度和泛化性。
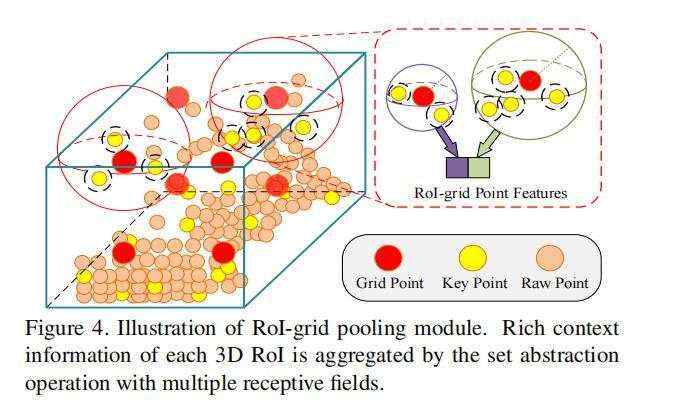
作者在这里提出了基于SA操作的keypoint-to-grid ROI feature abstraction,用于多尺度的ROI特征的编码。
对于一个3D ROI,PV-RCNN中提出了ROI-grid pooling操作,在每个3D proposal中,均匀的采样6*6*6个grid point点,并采用和PointNet++中和SA一样的操作,并在这些grid point点的多个尺度半径内分别聚合来自VSA中2048或4096个关键点特征的信息。公式如下:

 为关键点到特征点的距离,
 为半径(分别为0.8m和1.6m),
 为来自Pj的关键点特征。
聚合后的特征采用一个简单的PointNet网络来聚合关键点特征集,产生该grid point的特征,公式如下:
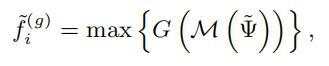
其中M(·)代表在k个grid point中固定半径内 关键点特征集合中的随机采样操作,在实现中,每个集合中最大采样16或32个voxel-wise feature,节省计算资源;G(·)代表多层感知网络(MLP),来编码关键点的特征和相对位置。max(·)操作取每个keypoint feature set中特征最大的特征作为grid point特征。
最后将不同半径大小的grid point特征拼接在一起来获取更加丰富的多尺度语义信息。
在获得所有的grid point特征后,使用一个两层的MLP网络将特征转换到最终的256维度,用以代表该proposal。
ROI grid Pooling操作相比于Point RCNN、Part A2、STD模型的ROI池化操作,拥有更好的感受野信息,因为在ROI grid Pooling的时候,gridpoint包含的关键点特征可能超出了proposal本身,获取到了3D ROI边缘的特征信息;而之前模型的ROI Pooling操作仅仅池化proposal内部的点的特征(Point RCNN),或者池化很多无意义零点的特征(Part A2、STD)来作为ROI feature。
最终的refinement网络由两个分支构成,一个分支用于confidence预测,另外一个分支用于回归残差预测,同时confidence的预测变成了quality-aware 3D Intersection-over-Union (IoU),公式如下:

并使用cross-entropy损失函数来优化:

根据前面一阶段得到的anchor信息,生成二阶段refinement需要的proposal;其中在训练阶段需要生成512个proposal,推理阶段生成100个proposal。得到的结果如下:
rois (batch size, 512, 7) 7-->(x, y, z, l, w, h, θ)
roi_scores (batch size, 512) 每个proposal的类别预测置信度分数
roi_labels (batch size, 512) 每个proposal的预测得到的类别
代码在:pcdet/models/roi_heads/roi_head_template.py
    def proposal_layer(self, batch_dict, nms_config):
        """
        Args:
            batch_dict:
                batch_size:
                batch_cls_preds: (B, num_boxes, num_classes | 1) or (N1+N2+..., num_classes | 1)
                batch_box_preds: (B, num_boxes, 7+C) or (N1+N2+..., 7+C)
                cls_preds_normalized: indicate whether batch_cls_preds is normalized
                batch_index: optional (N1+N2+...)
            nms_config:
        Returns:
            batch_dict:
                rois: (B, num_rois, 7+C)
                roi_scores: (B, num_rois)
                roi_labels: (B, num_rois)
        """
        if batch_dict.get('rois', None) is not None:
            return batch_dict
        # 得到batch_size
        batch_size = batch_dict['batch_size']
        # 得到每一批数据的box预测结果 PV-RCNN : (batch,211200, 7)        PointRCNN: (batch * 16384, 7)
        batch_box_preds = batch_dict['batch_box_preds']
        # 得到每一批数据的cls预测结果 PV-RCNN : (batch,211200, 3)        PointRCNN    (batch * 16384, 3)
        batch_cls_preds = batch_dict['batch_cls_preds']
        # 用0初始化所有的rois的box参数 shape : (batch, 512, 7) 训练时为512个roi,测试时为100个roi
        rois = batch_box_preds.new_zeros((batch_size, nms_config.NMS_POST_MAXSIZE, batch_box_preds.shape[-1]))
        # 用0初始化所有的roi置信度     shape : (batch, 512) 训练时为512个roi,测试时为100个roi
        roi_scores = batch_box_preds.new_zeros((batch_size, nms_config.NMS_POST_MAXSIZE))
        # 用0初始化所有的roi的类别     shape : (batch, 512) 训练时为512个roi,测试时为100个roi
        roi_labels = batch_box_preds.new_zeros((batch_size, nms_config.NMS_POST_MAXSIZE), dtype=torch.long)
        # 逐帧计算每帧中的roi
        for index in range(batch_size):
            if batch_dict.get('batch_index', None) is not None:
                assert batch_cls_preds.shape.__len__() == 2
                # 得到所有属于当前帧的mask
                batch_mask = (batch_dict['batch_index'] == index)
            else:
                assert batch_dict['batch_cls_preds'].shape.__len__() == 3
                batch_mask = index  # 得到所有属于当前帧的mask
            # 得到当前帧的box预测结果和对应的cls预测结果
            # PV-RCNN box :(211200, 7) cls :(211200, 3)
            # Point Rcnn box :(16384, 7) cls :(16384, 3)
            box_preds = batch_box_preds[batch_mask]
            cls_preds = batch_cls_preds[batch_mask]
            # 取出每个点类别预测的最大的置信度和最大数值所对应的索引
            # cur_roi_scores: PV-RCNN (211200,) PointRCNN (16384, )
            cur_roi_scores, cur_roi_labels = torch.max(cls_preds, dim=1)
            if nms_config.MULTI_CLASSES_NMS:
                raise NotImplementedError
            else:
                # 进行无类别的nms操作  selected为经过NMS操作后被留下来的box的索引,不考虑不同类别的物体会在3D的空间中重叠
                # selected_scores为被留下来box的最大类别预测分数
                selected, selected_scores = class_agnostic_nms(
                    box_scores=cur_roi_scores, box_preds=box_preds, nms_config=nms_config
                )
            # 从所有预测结果中选取经过nms操作后得到的box存入roi中
            rois[index, :len(selected), :] = box_preds[selected]
            # 从所有预测结果中选取经过nms操作后得到的box对应类别分数存入roi中
            roi_scores[index, :len(selected)] = cur_roi_scores[selected]
            # 从所有预测结果中选取经过nms操作后得到的box对应类别存入roi中
            roi_labels[index, :len(selected)] = cur_roi_labels[selected]
        # 处理结果,成字典形式并返回
        # 将生成的proposal放入字典中  shape (batch, num_of_roi, 7)
        batch_dict['rois'] = rois
        # 将每个roi对应的类别置信度放入字典中  shape (batch, num_of_roi)
        batch_dict['roi_scores'] = roi_scores
        # 将每个roi对应的预测类别放入字典中  shape (batch, num_of_roi)
        batch_dict['roi_labels'] = roi_labels + 1
        # True
        batch_dict['has_class_labels'] = True if batch_cls_preds.shape[-1] > 1 else False
        batch_dict.pop('batch_index', None)
        return batch_dict
在选取出proposal后,需要对选取proposal对应的GT,用于计算loss。
注意:在训练阶段的proposal refinement中,只需要从512个proposal选取出128个样本进行refinement,同时正负样本比例为1:1(正样本不够则用负样本填充);如果一个proposal与GT的3D IOU大于0.55,则认为这个proposal为正样本,需要进行box refinement回归,否则,认为他是负样本。
实现流程:
1、使用self.get_max_iou_with_same_class()函数计算512个proposal与对应类别GT的3D IOU大小。
2、self.subsample_rois()函数完成128个proposal采样和proposal的正负样本分配。
3、类ProposalTargetLayer forward函数选取出来需要计算回归loss 的roi mask,在PV-RCNN中使用了带感知的IOU 当成置信度预测分数,并使用cross-entropy损失来进行优化。
4、并将选取出来的roi的GTBox转换到和PointRCNN一样的CCS坐标系下。
代码在:pcdet/models/roi_heads/target_assigner/proposal_target_layer.py
    def sample_rois_for_rcnn(self, batch_dict):
        """
        Args:
            batch_dict:
                batch_size:
                rois: (B, num_rois, 7 + C)
                roi_scores: (B, num_rois)
                gt_boxes: (B, N, 7 + C + 1)
                roi_labels: (B, num_rois)
        Returns:
        """
        batch_size = batch_dict['batch_size']
        # 第一阶段生成的每个roi的位置和大小 (batch, num_of_roi, 7) 点云坐标系中的 xyzlwhθ
        rois = batch_dict['rois']
        # 第一阶段预测的每个roi的类别置信度 roi_score (batch, num_of_roi)
        roi_scores = batch_dict['roi_scores']
        # 第一阶段预测的每个roi的类别 roi_score (batch, num_of_roi)
        roi_labels = batch_dict['roi_labels']
        # gt_boxes (batch, num_of_GTs, 8) (x, y, z, l, w, h, heading, class)
        gt_boxes = batch_dict['gt_boxes']
        code_size = rois.shape[-1]  # box编码个数:7
        # 初始化处理结果的batch矩阵,后续将每帧处理的结果放入此处。batch_rois (batch, 128, 7)
        batch_rois = rois.new_zeros(batch_size, self.roi_sampler_cfg.ROI_PER_IMAGE, code_size)
        # batch_gt_of_rois (batch, 128, 8) GTBox为7个box的参数和1个类别
        batch_gt_of_rois = rois.new_zeros(batch_size, self.roi_sampler_cfg.ROI_PER_IMAGE, code_size + 1)
        # batch_gt_of_rois (batch, 128)  ROI和GT的最大iou
        batch_roi_ious = rois.new_zeros(batch_size, self.roi_sampler_cfg.ROI_PER_IMAGE)
        # batch_roi_scores (batch, 128) ROI预测类别置信度
        batch_roi_scores = rois.new_zeros(batch_size, self.roi_sampler_cfg.ROI_PER_IMAGE)
        # batch_roi_labels (batch, 128) ROI预测的类别
        batch_roi_labels = rois.new_zeros((batch_size, self.roi_sampler_cfg.ROI_PER_IMAGE), dtype=torch.long)
        # 逐帧处理
        for index in range(batch_size):
            # 得到当前帧的roi、gt、roi的预测类别、roi类别的置信度
            cur_roi, cur_gt, cur_roi_labels, cur_roi_scores = \\
                rois[index], gt_boxes[index], roi_labels[index], roi_scores[index]
            k = cur_gt.__len__() - 1
            # 从GT中取出结果,因为之前GT中以一个batch中最多的GT数量为准,
            # 其他不足的帧中,在最后填充0数据。这里消除填充的0数据
            while k > 0 and cur_gt[k].sum() == 0:
                k -= 1
            cur_gt = cur_gt[:k + 1]  # (num_of_GTs, 8)
            cur_gt = cur_gt.new_zeros((1, cur_gt.shape[1])) if len(cur_gt) == 0 else cur_gt
            # 进行iou匹配的时候,只有roi的预测类别与GT相同时才会匹配该区域的roi到该区域的GT上
            if self.roi_sampler_cfg.get('SAMPLE_ROI_BY_EACH_CLASS', False):
                #  其中max_overlaps包含了每个roi和GT的最大iou数值,gt_assignment得到了每个roi对应的GT索引
                # max_overlaps(512, ) gt_assignment(512,)
                max_overlaps, gt_assignment = self.get_max_iou_with_same_class(
                    rois=cur_roi, roi_labels=cur_roi_labels,
                    gt_boxes=cur_gt[:, 0:7], gt_labels=cur_gt[:, -1].long()
                )
            else:
                iou3d = iou3d_nms_utils.boxes_iou3d_gpu(cur_roi, cur_gt[:, 0:7])  # (M, N)
                max_overlaps, gt_assignment = torch.max(iou3d, dim=1)
            # sampled_inds包含了从前景和背景采样的roi的索引
            """
            此处的背景采样不是意义上的背景,而是那些iou与GT小于0.55的roi,对这些roi进行采样
            sampled_inds(128,) roi的前背景采样
            """
            sampled_inds = self.subsample_rois(max_overlaps=max_overlaps)
            # 将当前帧中被选取的roi放入batch_rois中   cur_roi[sampled_inds]  shape :(len(sampled_inds), 7)
            batch_rois[index] = cur_roi[sampled_inds]
            # 将当前帧中被选取的roi的类别放入batch_roi_labels中
            batch_roi_labels[index] = cur_roi_labels[sampled_inds]
            # 将当前帧中被选取的roi与GT的最大iou放入batch_roi_ious中
            batch_roi_ious[index] = max_overlaps[sampled_inds]
            # 将当前帧中被选取的roi的类别最大预测分数放入batch_roi_scores中
            batch_roi_scores[index] = cur_roi_scores[sampled_inds]
            # 将当前帧中被选取的roi的GTBox参数放入batch_gt_of_rois shape (batch, 128, 8)
            batch_gt_of_rois[index] = cur_gt[gt_assignment[sampled_inds]]
        # 返回一帧中选取的roi预测的box参数、roi对应GT的box、roi和GT的最大iou、roi的类别预测置信度、roi的预测类别
        return batch_rois, batch_gt_of_rois, batch_roi_ious, batch_roi_scores, batch_roi_labels
函数:self.get_max_iou_with_same_class
代码在:pcdet/models/roi_heads/target_assigner/proposal_target_layer.py
    def get_max_iou_with_same_class(rois, roi_labels, gt_boxes, gt_labels):
        """
        Args:
            rois: (N, 7)
            roi_labels: (N)
            gt_boxes: (N, )
            gt_labels:
        Returns:
        """
        """
        :param rois: (N, 7)
        :param roi_labels: (N)
        :param gt_boxes: (N, 8)
        :return:
        """
        # (512, )用于存储所有roi与GT的最大iou数值
        max_overlaps = rois.new_zeros(rois.shape[0])
        # (512, )用于存储所有roi与GT拥有最大iou的GT索引
        gt_assignment = roi_labels.new_zeros(roi_labels.shape[0])
        # 逐类别进行匹配操作
        for k in range(gt_labels.min().item(), gt_labels.max().item() + 1):
            # 取出预测结果属于当前类别的roi mask
            roi_mask = (roi_labels == k)
            # 得到当前GTs中属于当前类别mask
            gt_mask = (gt_labels == k)
            # 如果当前的预测结果有该类别并且GTs中也有该类别
            if roi_mask.sum() > 0 and gt_mask.sum() > 0:
                # 根据mask索引roi中当前处理的类别 shape :(num_of_class_specified_roi, 7)
                cur_roi = rois[roi_mask]
                # 根据mask索引当前GTs中属于当前正在处理的类别 shape :(num_of_class_specified_GT, 7)
                cur_gt = gt_boxes[gt_mask]
                # 得到GT中属于当前类别的索引 shape :(num_of_class_specified_GT, )
                original_gt_assignment = gt_mask.nonzero().view(-1)
                # 计算指定类别下 roi和GT之间的3d_iou shape :
                # (num_of_class_specified_roi, num_of_class_specified_GT)
                iou3d = iou3d_nms_utils.boxes_iou3d_gpu(cur_roi, cur_gt)  # (M, N)
                # 取出每个roi与当前GT最大的iou数值和最大iou数值对应的GT索引
                cur_max_overlaps, cur_gt_assignment = torch.max(iou3d, dim=1)
                # 将该类别最大iou的数值填充进max_overlaps中
                max_overlaps[roi_mask] = cur_max_overlaps
                # 将该类别roi与GT拥有最大iou的GT索引填充入gt_assignment中
                gt_assignment[roi_mask] = original_gt_assignment[cur_gt_assignment]
        return max_overlaps, gt_assignment
函数:self.subsample_rois
代码在:pcdet/models/roi_heads/target_assigner/proposal_target_layer.py
def subsample_rois(self, max_overlaps):
"""此处的背景采样不是意义上的背景,而是那些iou与GT小于0.55的roi,对这些roi进行采样"""
# sample fg, easy_bg, hard_bg
# 每帧点云中最多有多少个前景roi和属于前景roi的最小thresh
fg_rois_per_image = int(np.round(self.roi_sampler_cfg.FG_RATIO * self.roi_sampler_cfg.ROI_PER_IMAGE))
fg_thresh = min(self.roi_sampler_cfg.REG_FG_THRESH, self.roi_sampler_cfg.CLS_FG_THRESH)
# 从512个roi中,找出其与GT的iou大于fg_thresh的那些roi索引
fg_inds = ((max_overlaps >= fg_thresh)).nonzero().view(-1)
# 将roi中与GT的iou小于0.1定义为简单背景,并得到在roi中属于简单背景的索引
easy_bg_inds = ((max_overlaps
# 将roi中与GT的iou大于等于0.1小于0.55的定义为难背景,并得到在roi中属于难背景的索引
hard_bg_inds = ((max_overlaps
# numel就是"number of elements"的简写。numel()可以直接返回int类型的元素个数
fg_num_rois = fg_inds.numel()
bg_num_rois = hard_bg_inds.numel() + easy_bg_inds.numel()
# 如果该帧中,前景的roi大于0,并且背景的roi也大于0
if fg_num_rois > 0 and bg_num_rois > 0:
# sampling fg 采样前景,选取fg_rois_per_image、fg_num_rois的最小数值
fg_rois_per_this_image = min(fg_rois_per_image, fg_num_rois)
# 将所有属于前景点的roi打乱,使用np.random.permutation()函数
rand_num = torch.from_numpy(np.random.permutation(fg_num_rois)).type_as(max_overlaps).long()
# 直接取前N个roi为前景,得到被选取的前景roi在所有roi中的索引
fg_inds = fg_inds[rand_num[:fg_rois_per_this_image]]
# sampling bg
# 背景采样,其中前景采样了64个,背景也采样64个,保持样本均衡,如果不够用负样本填充
bg_rois_per_this_image = self.roi_sampler_cfg.ROI_PER_IMAGE - fg_rois_per_this_image
# 其中self.roi_sampler_cfg.HARD_BG_RATIO控制了所有背景中难、简单背景的比例
bg_inds = self.sample_bg_inds(
hard_bg_inds, easy_bg_inds, bg_rois_per_this_image, self.roi_sampler_cfg.HARD_BG_RATIO
)
elif fg_num_rois > 0 and bg_num_rois == 0:
# sampling fg
rand_num = np.floor(np.random.rand(self.roi_sampler_cfg.ROI_PER_IMAGE) * fg_num_rois)
rand_num = torch.from_numpy(rand_num).type_as(max_overlaps).long()
fg_inds = fg_inds[rand_num]
bg_inds = []
elif bg_num_rois > 0 and fg_num_rois == 0:
# sampling bg
bg_rois_per_this_image = self.roi_sampler_cfg.ROI_PER_IMAGE
bg_inds = self.sample_bg_inds(
hard_bg_inds, easy_bg_inds, bg_rois_per_this_image, self.roi_sampler_cfg.HARD_BG_RATIO
)
else:
print('maxoverlaps:(min=%f, max=%f)' % (max_overlaps.min().item(), max_overlaps.max().item()))
print('ERROR: FG=%d, BG=%d' % (fg_num_rois, bg_num_rois))
raise NotImplementedError
# 将前景roi和背景roi的索引拼接在一起
sampled_inds = torch.cat((fg_inds, bg_inds), dim=0)
return sampled_inds
@staticmethod
def sample_bg_inds(hard_bg_inds, easy_bg_inds, bg_rois_per_this_image, hard_bg_ratio):
# 如果该帧中,难背景(iou与GT大于等于0.1小于0.55)和简单背景(iou与GT小于0.1)都大于0
# 则使用hard_bg_ratio控制难、简单样本的采样比例
if hard_bg_inds.numel() > 0 and easy_bg_inds.numel() > 0:
hard_bg_rois_num = min(int(bg_rois_per_this_image * hard_bg_ratio), len(hard_bg_inds))
easy_bg_rois_num = bg_rois_per_this_image - hard_bg_rois_num
# sampling hard bg
rand_idx = torch.randint(low=0, high=hard_bg_inds.numel(), size=(hard_bg_rois_num,)).long()
hard_bg_inds = hard_bg_inds[rand_idx]
# sampling easy bg
rand_idx = torch.randint(low=0, high=easy_bg_inds.numel(), size=(easy_bg_rois_num,)).long()
easy_bg_inds = easy_bg_inds[rand_idx]
bg_inds = torch.cat([hard_bg_inds, easy_bg_inds], dim=0)
# 如果该帧中,难背景的数量大于0;简单背景的数量等于0,则所有背景都从难背景中采样
elif hard_bg_inds.numel() > 0 and easy_bg_inds.numel() == 0:
hard_bg_rois_num = bg_rois_per_this_image
# sampling hard bg
rand_idx = torch.randint(low=0, high=hard_bg_inds.numel(), size=(hard


 京公网安备 11010802041100号 | 京ICP备19059560号-4 | PHP1.CN 第一PHP社区 版权所有